SpringBoot邮件实现

引言:SpringBoot实现简单的邮件传输

SpringBoot实现邮件传输

前提配置

邮箱设置

邮箱可以是QQ邮箱、163邮箱等等,这里使用163邮箱。

  1. 登录163邮箱
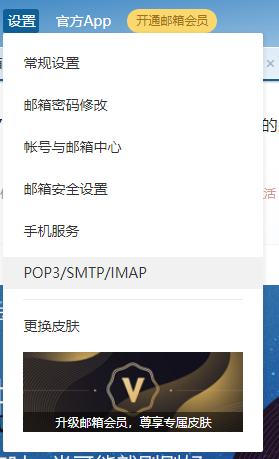
  2. 点开设置,里面有POP3/SMTP/IMAP这一个选项
image-20200818100340782
  1. 开启IMAP/SMTO和POP3/SMTP服务
  2. 进行授权密码配置(扫描二维码、发送短信)
  3. 记录返回的密码(注意,不是邮箱的登录密码)

POM文件添加

1
2
3
4
5
<!-- 邮件协议 -->
<dependency>
<groupId>org.springframework.boot</groupId>
<artifactId>spring-boot-starter-mail</artifactId>
</dependency>

项目文件配置

1
2
3
4
5
6
7
8
9
10
11
12
13
14
15
16
spring:
mail:
host: smtp.163.com # 不同的邮箱有不同的host
password: 之前记录的密码值
username: 你的邮箱@163.com
default-encoding: UTF-8
protocol: smtp
from: 和username相同
properties:
mail:
smtp:
auth: true
starttls:
enable: true
required: true

Spring下的文件配置

Mail文件设置

service文件

1
2
3
4
5
6
7
8
9
10
11
12
13
14
15
16
17
18
19
20
21
22
23
24
25
26
27
28
29
30
31
32
33
34
/**
* @author 董文浩
* @Date 2020/8/18 9:27
*/
public interface MailService {
/**
* 发送文本邮件
* @param to 收件人
* @param subject 主题
* @param content 内容
*/
void sendSimpleMail(String to, String subject, String content);

/**
* 发送HTML邮件
* @param to 收件人
* @param subject 主题
* @param content 内容
*/
public void sendHtmlMail(String to, String subject, String content);


/**
* 发送带附件的邮件
* @param to 收件人
* @param subject 主题
* @param content 内容
* @param filePath 附件
*/
public void sendAttachmentsMail(String to, String subject, String content, String filePath);

}

实现类:

1
2
3
4
5
6
7
8
9
10
11
12
13
14
15
16
17
18
19
20
21
22
23
24
25
26
27
28
29
30
31
32
33
34
35
36
37
38
39
40
41
42
43
44
45
46
47
48
49
50
51
52
53
54
55
56
57
58
59
60
61
62
63
64
65
66
67
68
69
70
71
72
73
74
75
76
77
78
79
80
81
82
83
84
85
86
87
88
89
90
91
92
93
94
95
96
97
98
99
100
101
102
103
104
105
106
107
108
109
110
111
112
113
114
115
116
117
import org.springframework.beans.factory.annotation.Autowired;
import org.springframework.beans.factory.annotation.Value;
import org.springframework.core.io.FileSystemResource;
import org.springframework.mail.SimpleMailMessage;
import org.springframework.mail.javamail.JavaMailSender;
import org.springframework.mail.javamail.MimeMessageHelper;

import org.slf4j.Logger;
import org.slf4j.LoggerFactory;
import org.springframework.stereotype.Service;

import javax.annotation.Resource;
import javax.mail.MessagingException;
import javax.mail.internet.MimeMessage;
import java.io.File;

/**
* @author 董文浩
* @Date 2020/8/18 9:28
*/
@Service
public class MailServiceImpl implements MailService {
private final Logger logger = LoggerFactory.getLogger(this.getClass());

/**
* Spring Boot 提供了一个发送邮件的简单抽象,使用的是下面这个接口,这里直接注入即可使用
*/
@Resource
private JavaMailSender mailSender;

/**
* 配置文件中我的qq邮箱
*/
@Value("${spring.mail.from}")
private String from;

/**
* 简单文本邮件
* @param to 收件人
* @param subject 主题
* @param content 内容
*/
@Override
public void sendSimpleMail(String to, String subject, String content) {
//创建SimpleMailMessage对象
SimpleMailMessage message = new SimpleMailMessage();
//邮件发送人
message.setFrom(from);
//邮件接收人
message.setTo(to);
//邮件主题
message.setSubject(subject);
//邮件内容
message.setText(content);
//发送邮件
mailSender.send(message);
}

/**
* html邮件
* @param to 收件人
* @param subject 主题
* @param content 内容
*/
@Override
public void sendHtmlMail(String to, String subject, String content) {
//获取MimeMessage对象
MimeMessage message = mailSender.createMimeMessage();
MimeMessageHelper messageHelper;
try {
messageHelper = new MimeMessageHelper(message, true);
//邮件发送人
messageHelper.setFrom(from);
//邮件接收人
messageHelper.setTo(to);
//邮件主题
message.setSubject(subject);
//邮件内容,html格式
messageHelper.setText(content, true);
//发送
mailSender.send(message);
//日志信息
logger.info("邮件已经发送。");
} catch (MessagingException e) {
logger.error("发送邮件时发生异常!", e);
}
}

/**
* 带附件的邮件
* @param to 收件人
* @param subject 主题
* @param content 内容
* @param filePath 附件
*/
@Override
public void sendAttachmentsMail(String to, String subject, String content, String filePath) {
MimeMessage message = mailSender.createMimeMessage();
try {
MimeMessageHelper helper = new MimeMessageHelper(message, true);
helper.setFrom(from);
helper.setTo(to);
helper.setSubject(subject);
helper.setText(content, true);

FileSystemResource file = new FileSystemResource(new File(filePath));
String fileName = filePath.substring(filePath.lastIndexOf(File.separator));
helper.addAttachment(fileName, file);
mailSender.send(message);
//日志信息
logger.info("邮件已经发送。");
} catch (MessagingException e) {
logger.error("发送邮件时发生异常!", e);
}
}
}

测试类测试

1
2
3
4
5
6
7
8
9
10
11
12
13
14
15
16
17
18
19
20
21
22
23
24
25
26
27
28
29
30
31
32
33
34
35
36
37
38
39
40
41
42
import com.yunhuo.xcjd.utils.mail.MailService;
import org.junit.Test;
import org.junit.runner.RunWith;
import org.springframework.boot.test.context.SpringBootTest;
import org.springframework.test.context.junit4.SpringRunner;

import javax.annotation.Resource;

/**
* @author 董文浩
* @Date 2020/8/18 08:47
*/
@RunWith(SpringRunner.class)
@SpringBootTest
public class UsermapperTest {

/**
* 注入发送邮件的接口
*/
@Resource
private MailService mailService;

/**
* 测试发送文本邮件
*/
@Test
public void sendmail() {
mailService.sendSimpleMail(
"1046467756@qq.com",
"主题:你好普通邮件",
"内容:第一封邮件");
}

@Test
public void sendmailHtml(){
mailService.sendHtmlMail(
"1046467756@qq.com",
"主题:你好html邮件",
"<h1>内容:第一封html邮件</h1>");
}
}

测试成功!

遇到报错

  1. 检查配置文件是否设置正确
  2. 检查是否可以ping通smtp.163.com